HOW TO SHOOT WITH WINDOW LIGHT | Natural Light Tutorial
Shooting indoors is a bit daunting, isn’t it? You need to think about the (lack of) light and how to manage the whole shooting process when you are surrounded by walls.
And light depends so much about the kind of windows you have at your disposal! It’s not the same to shoot in a lofty penthouse and a small brick house.
Well, even though it has its pros and cons, it has one very big advantage - shooting indoors will keep yourself, your gear and your models dry and warm!
Unlike spots outside where you need to be mindful of the weather, it can rain cats and dogs while you can still have your shoot.
That being said, window light is ever-changing.
It can be tempting to shoot with artificial lighting just to have control, but if you want to master natural light, this is a guide for you!
SIZE MATTERS
As far as windows are concerned, at least!
Smaller windows = less light
Bigger windows = more light
That’s common sense, isn’t it?
But think about windows as LIGHT SOURCES.
That means you need to take into account that a bigger window - a bigger source of light - will give you more diffused light overall. Your model can stand close to it and be well-lit.
On the other hand, a smaller window means that, even if the model is close to it, it may give you sharp contrasts on the parts of the model that are not in direct light.

Lisette’s face on this photo was lit using natural window light coming from the left side of the image, with just some light leaks from another window (on the right side).
It was created in the middle of the summer, but you wouldn’t really be able to tell. The sun hadn’t reached the window at that point, thus the light coming through it had a blue hue.

In this shot, the light is coming straight at Matea’s face. The light was soft, as the sun was setting down. This softened all the shadows on her face and enhanced her elegant face and blue eyes.
SOFT OR HARSH LIGHT
Window light varies a lot because it mirrors the light conditions outside.
Depending on elements such as the time of day, the time of the year, as well as weather conditions, you can get softer or harder light.
SOFTER LIGHT is invaluable for portraiture, as it compliments the face. Pimples are also less visible in such conditions, so it makes for a good choice to flatter the model’s face.
HARSH LIGHT gives your images ‘‘an edge’’. It can be used in portraiture, but keeping in mind that the photographs are going to be more graphic than if you shot them in soft light.

This image has a slight ‘‘edge’’ because of the styling and the look on my face. The light, however, is extremely soft! It is the perfect kind of light to shoot portraiture, as pimples and wrinkles are diminished, while the actual bone structure is being enhanced.
TIME OF DAY
Have you ever thought ‘‘what great light’’ as you were about the watch the sunset?
Or walking down the street on a breezy spring morning?
Light changes a lot during the day and you can use its quality to your advantage.
If it’s a sunny day, the light early in the morning will be crisp and joyful.
During the day it’ll become strong and give your models harsh shadows on the face.
The last hour before sunset is called ‘‘the golden hour’’, thus emphasizing the warm, yellow tones of the light at that time. The hour following the golden hour is called ‘‘the blue hour’’. It is the hour right after sunset, while there is still some light on the horizon. It is subtle and characterized by cool blue hues.

The light illuminating Angelica’s face was coming through a large set of windows in a cafe’. You can see the size of the windows by taking a peek at the patch of light behind the model. The size of them ensured that her face will be evenly lit even though the sun was still a tiny bit too high on the horizon to have soft light. This was shot during the first quarter of the ‘‘golden hour’’.
WEATHER CONDITIONS
Using window light is especially a good idea during rainy or snowy days. Since shooting outside can be a real hassle, having all your gear (and models) indoors provides that everything and everyone will stay protected from the weather.
Cloudy or rainy days make colours look rather flat. Window light during such days will be beautifully soft - perfect for portraiture.
The downside is that, since there won’t be as much light, you might need to use:
A HIGHER ISO
You will be able to shoot with a higher shutter speed, but you will compromise the quality of the shots because a higher ISO means having more grain in the photographs. Photo cameras that have a full-sized sensor can capture much more details with higher ISO than cameras with a cropped sensor.
orA LONGER EXPOSURE
You do this by lowering your shutter speed. The benefit is that the quality of the images will remain good, but the model will need to stay rather still to avoid blurry shots.
or
A WIDER APERTURE
This means selecting the lowest F number you have on your lens (such as F1.4 or F2.8) - more light will come in the lens and you will be able to use higher shutter speeds (shorter exposures), but one part of the image will be sharp and in focus, while the rest will be blurry
Very likely, you will need to play with all of the above mentioned settings to achieve the look you want. I first determine what kind of look I want to achieve and base my aperture settings on this.
Then I push my ISO just a tiny bit and lower my shutter speed first and see if I can get away with it.
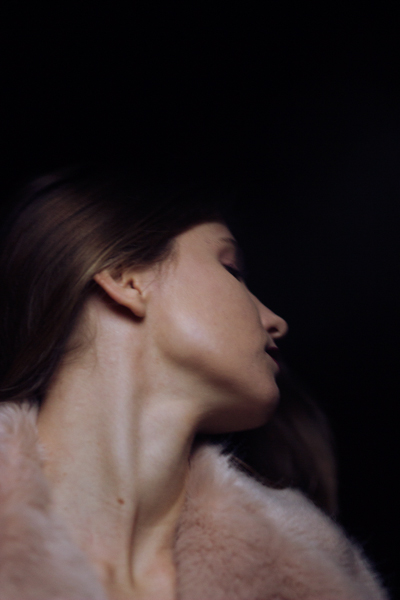
Ema’s face on this image is bathed in soft light, while the background is completely dark and you can’t see what was behind her. We shot this in her attic with a small roof window being the only source of light. Since it was already rather dark inside, I needed to push my ISO to 100 while having my aperture at F/1.4 and exposure time set to 1/100 s. Due to that longer exposure time, there is a slight blur in her hair, but that fit with the theme perfectly!
ADDITIONAL LIGHTS
If you want to add more light, one way is just using a reflector to bounce light back onto the model.
However, you can also use artificial lights as your second light source, such as strobes, a beauty dish, a softbox or even a simple ring light.
Any kind of additional lights change the mood of the images, but tweaking them just right can still give you a feeling that only natural light has been used.
TIME OF THE YEAR
The first thing I notice about summer, as a contrast to winter, is the different quality of light and the way colours stand out.
Light differs a lot during the change of seasons. But it also depends on the location. Summertime in Australia is not the same as summertime in Norway!
As a general rule though, the light in the summer it is all bright and shiny, while saturating the colours on sunny autumn days and becoming bleaker as winter’s approaching.
Windows will make that light even more subtle, but it’s a completely different feel if you shoot during a day in summer or in winter.

The window in this room was a small one, but enough to light up Novella’s face and upper body.
LET’S RECAP
Shooting indoors using only window light is a good choice for portraiture, especially if the weather conditions outside are preventing you from shooting on location.
Window light changes depending on a lot of factors, such as:
- the size of the windows
- weather conditions
- time of the day
- time of the year
- geographical location
If you don’t have enough light, you can either use additional (artificial) lighting, or can try to change the ISO, shutter speed (for longer exposures) and aperture.


